
Retail Vendor Onboarding: The Complete Guide for New Suppliers
Last Updated: Mar 22, 2026
A step-by-step guide to everything that happens after a retail buyer says yes—from legal paperwork and GS1 registration to EDI setup, packaging compliance, and shipping your first order.
In This Guide
You Got the PO—Now What?
Retail vendor onboarding is the process of setting up everything a new supplier needs to do business with a retailer—from signing the vendor agreement and registering for their portal to configuring EDI, meeting packaging requirements, and shipping your first order on time.
If you’re a D2C brand that just landed your first retail deal, congratulations. Now the real work begins. The period between “the buyer said yes” and “your product is on the shelf” is where most new vendors stumble. You’ll face acronyms you’ve never heard (ASN, SSCC, OTIF), systems you’ve never used (Retail Link, EDI), and compliance requirements that can result in chargebacks before you’ve shipped a single unit.
This guide walks you through the entire vendor onboarding process, step by step, in the order things actually need to happen. It’s written for the vendor, not the buyer—because every existing “vendor onboarding” article on the internet is about vetting IT vendors, not surviving your first 90 days as a retail supplier.
Key Facts
- ●Typical timeline: 30–90 days from vendor approval to first shipment
- ●Upfront costs: $3,000–$12,000+ (GS1, EDI, insurance, packaging)
- ●Critical path: GS1 registration → EDI setup → portal access (these block everything else)
- ●#1 cause of first-order failures: Starting onboarding tasks too late—EDI setup alone takes 4–8 weeks
- ●Who this guide is for: D2C brands, emerging CPG companies, and small manufacturers entering retail for the first time
Understanding the Vendor Onboarding Timeline
Most retailers expect new vendors to be fully operational within 30 to 90 days of approval. The exact timeline depends on the retailer—Walmart and Target have more complex onboarding processes than a regional grocery chain—but the critical path is roughly the same everywhere.
The biggest mistake new vendors make is treating onboarding as a sequential to-do list. It’s not. Multiple workstreams need to run in parallel. While you’re waiting for GS1 to process your application, you should be selecting an EDI provider. While your EDI provider is configuring your trading partner setup, you should be reviewing the routing guide and getting your packaging compliant.
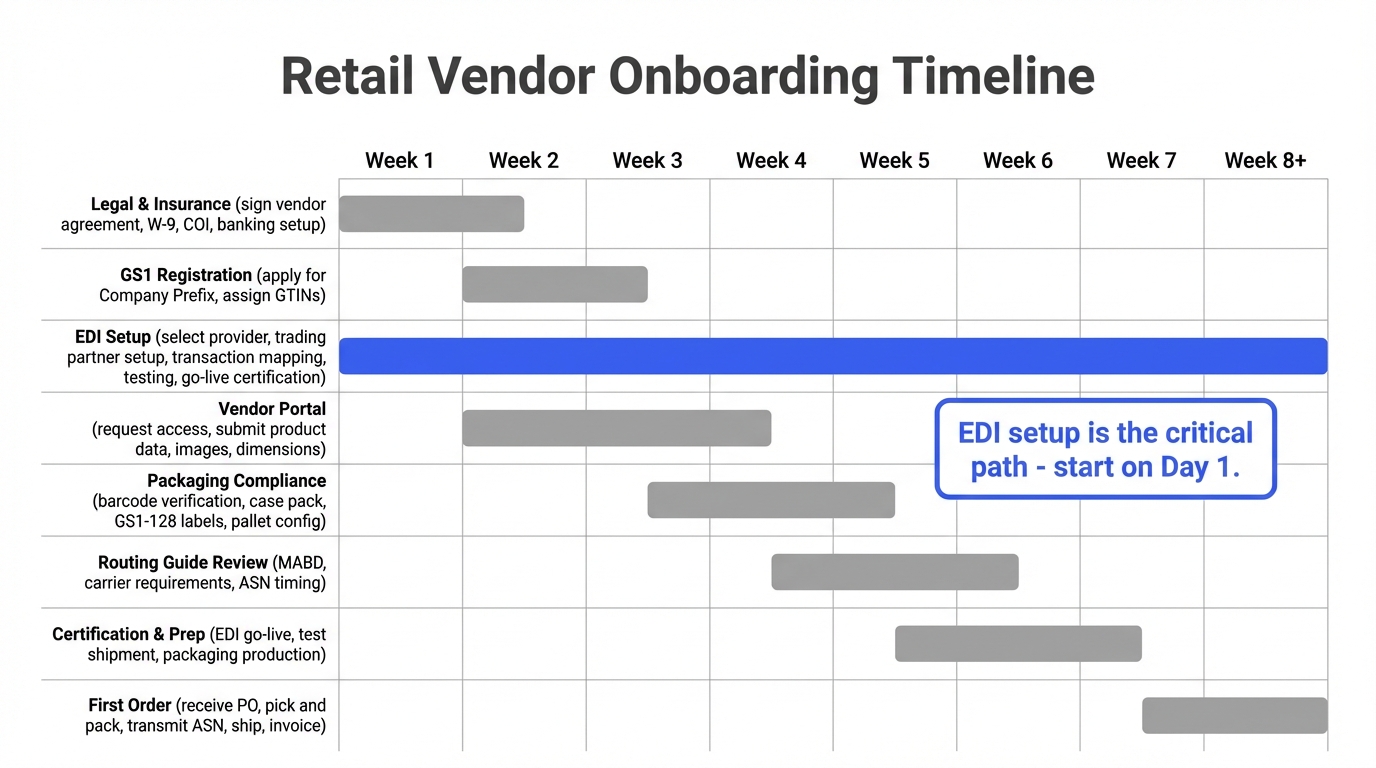
Here’s what a typical 8-week vendor onboarding timeline looks like:
| Week | Tasks | Blockers If Late |
|---|---|---|
| Week 1–2 | Sign vendor agreement, submit W-9 and COI, apply for GS1 Company Prefix, select EDI provider, request portal access | GS1 processing delays cascade into barcode and labeling delays |
| Week 2–4 | Assign GTINs, begin EDI trading partner setup, submit product data to portal, review routing guide | Portal access delays block item setup and PO visibility |
| Week 4–6 | EDI testing with retailer, packaging compliance review, barcode verification, pallet configuration | EDI testing failures push back go-live certification |
| Week 6–8 | EDI go-live certification, test shipment (if required), finalize packaging production, book delivery appointment | Failed certification means no POs can flow |
| Week 8+ | Receive first PO, fulfill order, transmit ASN, ship, submit invoice | Missed MABD triggers OTIF chargebacks on very first order |
Why Starting Late Is Costly
If you miss your first delivery window, most retailers won’t just reschedule—they’ll issue a chargeback. Walmart’s OTIF (On Time In Full) program tracks compliance from your very first order. Late shipments are fined at 3% of the cost of goods shipped. Starting EDI setup in week 1, not week 4, is the single most impactful thing you can do.
Step 1: Legal and Financial Setup
Before anything else, you’ll sign the vendor agreement. This is a legally binding contract that covers payment terms, return policies, chargeback schedules, insurance requirements, and indemnification clauses. Read it carefully—vendor agreements heavily favor the retailer, and most terms are non-negotiable for new vendors.
Documents You’ll Need
- ✓W-9 (or W-8BEN for international vendors): Tax identification form required before the retailer will issue any payments.
- ✓Certificate of Insurance (COI): Product liability insurance with the retailer named as an additional insured. Most major retailers require $1 million to $2 million in general liability coverage and $1 million to $2 million in product liability coverage.
- ✓Banking information: ACH details for electronic payments. Most retailers pay via ACH on net-30 to net-90 terms.
- ✓Signed vendor agreement: The master contract governing your relationship. Pay close attention to chargeback schedules, deduction rights, and return/markdown policies.
Watch Out
Vendor agreements often include automatic deduction rights—the retailer can deduct chargebacks, markdowns, and advertising fees directly from your payments without prior approval. Understand these clauses before you sign. Once you’re in the system, disputing deductions is an uphill battle. Learn more about retail chargebacks →
Payment Terms: What to Expect
Retail payment terms are slower than what most D2C brands are used to. Net-30 is standard for established vendors, but new vendors often start at net-60 or net-90. Some retailers offer early payment programs (like Walmart’s Early Pay) at a discount—you get paid faster but offer a discount (typically 1–2%). Factor these payment cycles into your cash flow planning before you accept the PO.
Step 2: GS1 Registration and UPC Assignment
Every product sold at retail needs a unique barcode, and that barcode comes from GS1. If you’ve been selling D2C, you may have bought individual UPCs from a reseller on eBay or Amazon. That won’t work for retail. Major retailers require UPCs issued under a GS1 Company Prefix registered to your company.
What You Need to Do
- Apply for a GS1 Company Prefix at gs1us.org. Pricing starts at $250/year for up to 10 products and scales up based on how many unique items you need to identify. Processing takes 1–3 business days.
- Assign GTINs (Global Trade Item Numbers) to every product variant. Each unique size, color, flavor, and pack configuration gets its own GTIN. A 12-pack of your product has a different GTIN than a 6-pack, even though the individual items inside may be the same.
- Generate UPC-A barcodes for each GTIN. These are the barcodes printed on your product packaging that get scanned at the register. GS1 provides barcode generation tools, or you can use your packaging designer’s software.
- Test barcode scanability before production. Print a sample and verify it scans correctly with a barcode reader. Barcodes with inadequate quiet zones, poor contrast, or incorrect check digits will fail at the retailer’s DC and trigger chargebacks.
Why Resold Barcodes Don’t Work
Barcodes purchased from third-party resellers are registered under someone else’s GS1 Company Prefix. When a retailer looks up the barcode in the GS1 registry, it won’t match your company name. Walmart, Target, and most major retailers verify GS1 registration as part of vendor onboarding and will reject products with mismatched or unregistered barcodes.
You’ll also need to understand GS1-128 labels (also called SSCC labels) for your shipping cartons. These are separate from the UPC barcodes on your products—they identify the carton or pallet itself and are scanned at the retailer’s distribution center. Read our complete GS1-128 labeling guide →
Step 3: Vendor Portal Registration
Every major retailer has an online portal where vendors manage their account, submit product data, view purchase orders, track shipments, and check compliance scores. Getting portal access is one of the first things you should do after signing the vendor agreement, because several other onboarding tasks depend on it.
| Retailer | Portal Name | Key Functions | Setup Notes |
|---|---|---|---|
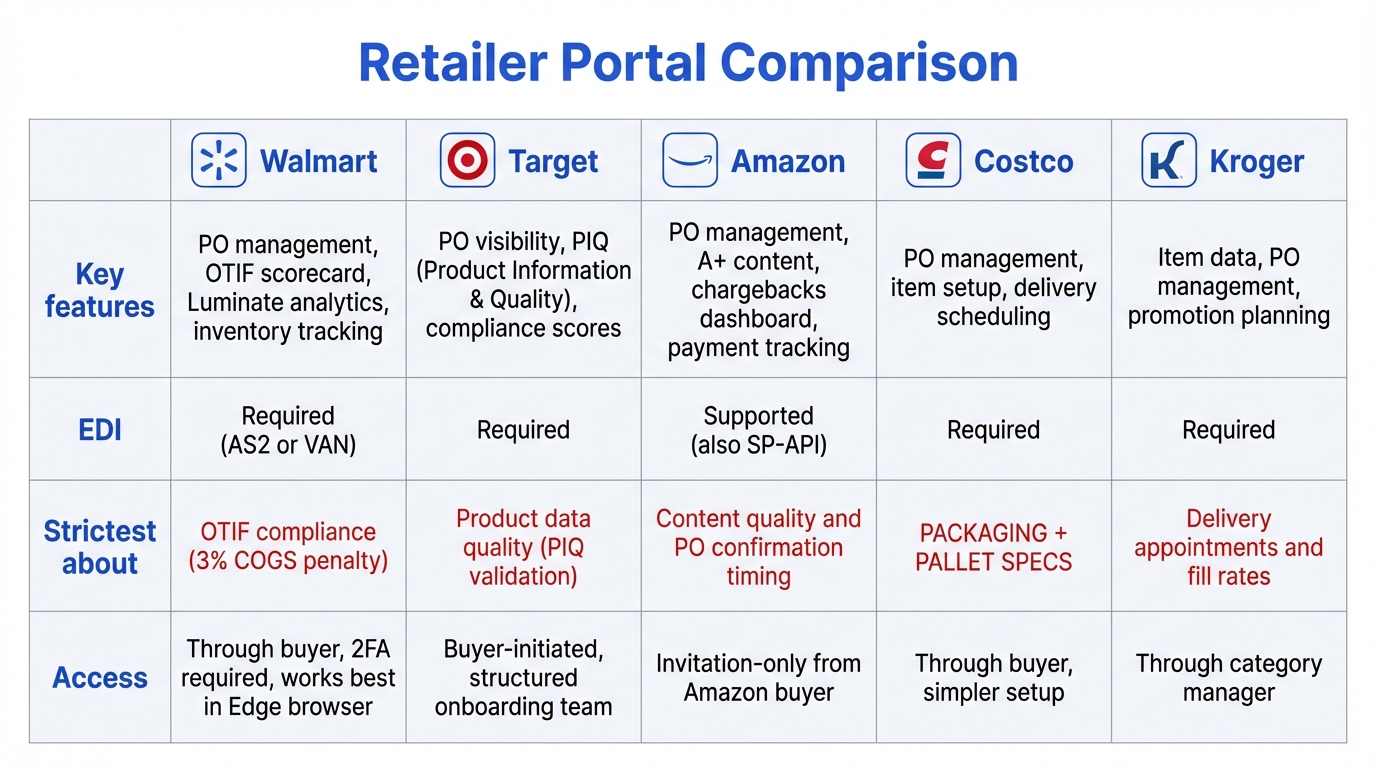
| Walmart | Retail Link | PO management, inventory tracking, OTIF scorecard, item setup | Request access through your buyer. Works best in Chrome or Edge. Two-factor authentication required. |
| Target | Partners Online (POL) | PO visibility, product data (PIQ), shipment tracking, compliance scores | Buyer initiates access. Product Information & Quality (PIQ) data must be submitted before first PO. |
| Amazon | Vendor Central | PO management, A+ content, chargebacks, payment tracking | Invitation-only from Amazon buyer. Mostly self-service. Focus on product content (images, A+ pages). |
| Costco | Costco Vendor Portal | PO management, item setup, delivery scheduling | Simpler than Walmart/Target portals. Focus is on packaging and pallet compliance instead. |
| Kroger | Supplier Hub | Item data, PO management, promotion planning | Access through category manager. Delivery appointments via third-party scheduling system. |
Product Data Submission
Once you have portal access, you’ll need to submit detailed product information for every item you’re selling. This is called item setup and typically includes:
- ●Product dimensions and weights (individual unit, inner pack, case pack, pallet)
- ●High-resolution product images (white background, specific angle and size requirements)
- ●Product descriptions, ingredients, nutritional facts (for food products)
- ●UPC/GTIN numbers for each variant
- ●Country of origin, HTS codes (for imported goods)
- ●Safety data sheets (SDS) for regulated products
Common Portal Gotchas
Some vendor portals have specific browser requirements (Retail Link works best in Chrome or Edge). Login tokens expire frequently. Approval queues for new vendor accounts can take 1–2 weeks. Don’t wait until you need to submit a PO acknowledgment to discover you can’t log in.
Step 4: EDI Setup
EDI (Electronic Data Interchange) is the system retailers use to exchange purchase orders, shipping notices, and invoices with vendors electronically. Every major retailer requires it, and it’s typically the longest single task in the onboarding process—4 to 8 weeks from start to go-live. Read our complete EDI guide →
Choosing an EDI Provider
Unless you have an in-house IT team with EDI experience, you’ll need a third-party EDI provider. The major options are:
| EDI Option | Best For | Typical Cost | Setup Time |
|---|---|---|---|
| Web EDI Portal | Low-volume vendors (<50 orders/month) | $50–$200/month | 1–2 weeks |
| Integrated EDI Solution | Growing vendors who need automation | $200–$500/month | 4–6 weeks |
| Full-Service EDI Provider | High-volume vendors with multiple retail partners | $500–$1,000+/month | 6–8 weeks |
| 3PL-Provided EDI | Vendors using 3PL for fulfillment | Often included in 3PL fees | 2–4 weeks |
The EDI Setup Process
- Select a provider and sign up. Ask whether they already have a connection to your retailer—this dramatically reduces setup time.
- Trading partner setup: Your EDI provider configures the connection between your system and the retailer’s system. This includes ISA/GS qualifiers, communication protocols (AS2, SFTP, VAN), and transaction set mapping.
- Transaction mapping: Map the four core transaction sets—EDI 850 (Purchase Order), EDI 855 (PO Acknowledgment), EDI 856 (ASN), and EDI 810 (Invoice)—between the retailer’s format and your system.
- Testing: Exchange test transactions with the retailer. Both sides verify the data flows correctly. This typically takes 1–3 weeks.
- Go-live certification: Some retailers (like Costco) have a formal certification process. Others simply confirm that test transactions passed.
Overwhelmed by Retailer Requirements?
RetailerHub’s Compliance IQ lets you ask any question about retailer-specific requirements—EDI setup, labeling specs, delivery windows—and get instant, accurate answers.
Step 5: Packaging and Labeling Compliance
Retail packaging requirements go far beyond what D2C brands are used to. Your product packaging, case packs, inner packs, master carton labels, and pallet configuration all need to meet the retailer’s specific standards. Non-compliant packaging is one of the top reasons shipments get rejected at the distribution center.
Key Packaging Requirements
UPC Barcode Placement
Every unit needs a scannable UPC-A barcode on the retail packaging. Placement, size, and quiet zone requirements vary by retailer. The barcode must scan on the first pass—smudged, wrinkled, or obscured barcodes delay receiving and can trigger chargebacks.
Case Pack Structure
Retailers specify exactly how many units go in each case (inner pack and master carton). A case pack of 12 means exactly 12—not 11, not 13. Each master carton needs a GS1-128 label with the SSCC barcode. See our GS1-128 labeling guide →
Retail-Ready Packaging (RRP)
Some retailers require shelf-ready packaging that can go directly from the shipping carton to the shelf without repackaging. This includes display-ready cases, PDQ trays, and perforated cartons. Learn about retail-ready packaging requirements →
Polybag and Suffocation Warnings
Products shipped in polybags require suffocation warning labels. The warning text, font size, and languages vary by state and retailer. Getting this wrong is both a compliance violation and a legal liability. Read our polybag warning guide →
Pallet Configuration
Retailers have specific requirements for how cases are stacked on pallets. This includes pallet type (GMA standard 48×40 is most common), maximum height, stacking pattern (column vs. interlock), stretch wrap specs, and pallet label placement. The retailer’s routing guide will specify these requirements. Ship on the wrong pallet type and the entire load can be refused.
Step 6: Routing Guide Review
The routing guide is the retailer’s master document that specifies every requirement for how products must be packaged, labeled, shipped, and delivered. It covers carrier requirements, delivery windows, pallet specifications, labeling standards, and penalty schedules. Think of it as the rulebook for your entire physical relationship with the retailer.
Every retailer has one, and they’re typically 50–200+ pages long. Reading yours cover-to-cover is not optional—it’s the single most important document in your vendor relationship.
Key Sections to Focus On
- ●MABD (Must Arrive By Date): The absolute deadline for when your shipment must arrive at the DC. Miss it and you’ll face OTIF chargebacks.
- ●Carrier requirements: Which carriers are approved, whether you use collect freight (retailer’s carriers) or prepaid (your carriers), and how to book delivery appointments.
- ●ASN timing: When the Advance Ship Notice must be transmitted relative to shipment. Some retailers require the ASN before the truck leaves your dock. See our ASN guide →
- ●Labeling standards: Exact specifications for GS1-128 labels, carton markings, and pallet labels—including placement, size, and required data fields.
- ●Chargeback schedule: What penalties apply for each type of violation. Knowing the fee structure helps you prioritize which requirements to get right first.
RetailerHub’s Compliance IQ analyzes your retailer’s requirements and gives you instant answers to questions like “What are Walmart’s pallet height requirements?” or “When does Target need the ASN submitted?”
Step 7: First Order Fulfillment
Your first retail order is the moment everything comes together—and the moment where mistakes are most expensive. Retailers pay close attention to first-order performance because it sets the tone for the entire relationship.
The First Order Workflow
- Receive the PO via EDI (850): Your EDI system receives the purchase order. Verify quantities, item numbers, ship-to addresses, and delivery dates. Send the PO Acknowledgment (855) promptly.
- Pick and pack to retailer specs: Follow the routing guide for case pack quantities, pallet configuration, stretch wrap, and labeling. Every carton gets a GS1-128 label. Every pallet gets a pallet label.
- Transmit the ASN (856) before shipment: The Advance Ship Notice must be sent before the truck leaves your dock (or within the timing window specified in the routing guide). Include accurate SSCC numbers, quantities, and PO references.
- Book the delivery appointment: Most retailers require appointments at their distribution centers. Book through the retailer’s portal or their designated scheduling system. Arrive on time—late arrivals are turned away.
- Ship and track: Use the approved carrier (collect or prepaid, per the routing guide). Track the shipment and verify delivery against the MABD.
- Submit the invoice (810): After shipment, transmit the EDI invoice. The invoice must match the PO and ASN in quantities and pricing. Mismatches delay payment.
If Something Goes Wrong
If you can’t fill the full order, communicate early. Send a partial PO acknowledgment (855) noting which items you can’t fulfill. Ship what you can on time rather than holding the entire order for a backorder. A partial shipment with a correct ASN is far better than a late full shipment—OTIF penalties for lateness are often steeper than for shorts. See our warehouse SOP guide →
Do You Need a 3PL for Retail Fulfillment?
One of the biggest decisions new retail vendors face is whether to fulfill orders themselves or partner with a third-party logistics provider (3PL). Both approaches work, but they come with very different tradeoffs in cost, control, and risk.
When to Use a 3PL
A 3PL experienced in retail fulfillment already has the infrastructure you need: EDI connections to major retailers, thermal label printers for GS1-128 labels, pallet-building expertise, distribution center delivery experience, and staff trained in retail compliance. For a first-time retail vendor, this can dramatically reduce the risk of chargebacks on your first order.
Many 3PLs include EDI as part of their fulfillment services at no additional cost—their warehouse management system generates ASNs, transmits shipping notices, and manages retailer integrations automatically. If you’re currently shipping D2C from a small warehouse or your garage, a 3PL is almost certainly the right choice for retail.
When to Self-Fulfill
Self-fulfillment makes sense if you already have warehouse space, a WMS (warehouse management system), and staff experienced with retail shipping. You’ll have more control over quality and can respond faster to issues. But you’ll need to invest in EDI separately, buy label printers, and train your team on retail-specific processes like pallet building, ASN transmission, and appointment scheduling.
| Factor | 3PL | Self-Fulfill |
|---|---|---|
| EDI | Usually included | Must set up separately ($100–$1,000/mo) |
| Compliance risk | Lower (experienced staff) | Higher (learning curve) |
| Control | Less (dependent on 3PL) | Full control over process |
| Upfront cost | Lower (no equipment needed) | Higher (printers, WMS, training) |
| Per-order cost | Higher (3PL margins) | Lower at scale |
| Best for | First-time vendors, low volume | Experienced teams, high volume |
The hybrid approach: Some vendors start with a 3PL for their first retailer, learn the process, and then bring fulfillment in-house once they understand the requirements and have enough volume to justify the investment. This gives you the safety net of experienced fulfillment partners while you build internal capabilities.
The Retail Vendor Onboarding Checklist
Use this checklist to track your onboarding progress. Tasks are organized by week, but many run in parallel—start EDI and GS1 in week 1, not after legal is complete.
Week 1–2: Legal, Insurance & Registration
- ☐Review and sign vendor agreement
- ☐Submit W-9 (or W-8BEN) tax documentation
- ☐Obtain product liability insurance and send COI to retailer
- ☐Set up banking/ACH for electronic payments
- ☐Apply for GS1 Company Prefix at gs1us.org
- ☐Select and sign up with an EDI provider
- ☐Request vendor portal access through your buyer
Week 2–4: Data, Portal & EDI Configuration
- ☐Assign GTINs to every product variant (size, color, flavor)
- ☐Generate and test UPC-A barcodes
- ☐Log into vendor portal and complete account setup
- ☐Submit product data: dimensions, weights, images, descriptions
- ☐Begin EDI trading partner setup with your provider
- ☐Read the routing guide cover-to-cover
Week 4–6: Testing & Compliance
- ☐Complete EDI testing (exchange test 850, 855, 856, 810)
- ☐Verify GS1-128/SSCC label format and print quality
- ☐Confirm case pack and inner pack structure meets requirements
- ☐Validate pallet configuration (type, height, stacking pattern)
- ☐Review packaging for polybag/suffocation warnings if applicable
- ☐Verify barcode scanability on production packaging
Week 6–8: Certification & Preparation
- ☐Obtain EDI go-live certification from retailer
- ☐Complete test shipment if retailer requires one
- ☐Finalize packaging production run
- ☐Confirm inventory availability for first PO
- ☐Book delivery appointment at retailer DC
Week 8+: First Order
- ☐Receive first PO via EDI (850)
- ☐Send PO Acknowledgment (855)
- ☐Pick, pack, and label per routing guide specs
- ☐Transmit ASN (856) before shipment
- ☐Ship using approved carrier, arrive by MABD
- ☐Submit invoice (810) after shipment
- ☐Monitor portal for receiving confirmation and compliance scores
Retailer-Specific Onboarding Differences
While the general onboarding process is similar across retailers, each one has unique systems, timelines, and areas of emphasis. Here’s what to expect from the major retailers:
Walmart
Key Systems
Retail Link portal, OTIF scorecard, SQEP (Supplier Quality Excellence Program), Scintilla analytics
What They’re Strictest About
OTIF compliance—tracked from your very first order. 3% COGS penalty for late shipments. ASN accuracy is closely monitored.
New Vendor Tips
Start EDI setup immediately. Request Retail Link access through your buyer on day one. Walmart’s Early Pay program can help with cash flow (2% discount for faster payment). Join the Walmart Supplier Academy for free training.
Target
Key Systems
Partners Online (POL), Product Information & Quality (PIQ), Target+ (marketplace)
What They’re Strictest About
Product data quality (PIQ). Every item must have complete, accurate product information before orders can flow. Image requirements are strict.
New Vendor Tips
Submit PIQ data early—it takes time to validate and approve. Target has a structured onboarding team that walks you through the process. Take advantage of this support.
Amazon (Vendor Central)
Key Systems
Vendor Central portal, SP-API (for integrated vendors), Chargeback management dashboard
What They’re Strictest About
Content (A+ product pages, images) and PO confirmation timing. Amazon’s automated systems issue chargebacks aggressively for late confirmations and ASN failures.
New Vendor Tips
Amazon is more API-driven than other retailers. If you have technical resources, consider SP-API integration. Focus on A+ content early—it directly impacts sales.
Costco
Key Systems
Costco Vendor Portal, manual PO process for some categories
What They’re Strictest About
Packaging and pallet specifications. Costco has exacting requirements for pallet height, case pack configuration, and display-ready packaging. Labeling must be precise.
New Vendor Tips
Costco’s onboarding process is simpler administratively but unforgiving on physical compliance. Get a sample shipment right before going live. Build relationships with your buyer—Costco is more relationship-driven than system-driven.
Kroger
Key Systems
Supplier Hub, appointment scheduling via third-party system
What They’re Strictest About
Delivery appointments and fill rates. Kroger charges fees for missed appointments and low fill rates. Perishable categories have extremely tight delivery windows.
New Vendor Tips
Connect with your Kroger category manager early. Kroger divisions can have different requirements, so confirm which division(s) you’re shipping to and whether they have unique specs.
7 Common Vendor Onboarding Mistakes (and How to Avoid Them)
1. Waiting to start EDI until everything else is done
EDI setup takes 4–8 weeks and is the critical path. Many vendors treat it as step 5 when it should be step 1. Start your EDI provider search the same day you sign the vendor agreement.
2. Using resold barcodes from third-party sellers
Barcodes from eBay or bulk resellers are registered under someone else’s GS1 prefix. Retailers verify GS1 registration and will reject products with mismatched barcodes. Invest in your own GS1 Company Prefix from the start.
3. Not reading the routing guide
The routing guide is the retailer’s compliance bible. Vendors who skim it or skip it are the ones who get hit with chargebacks on their first shipment. Read every section, especially MABD, ASN timing, and pallet specs.
4. Underestimating packaging complexity
D2C packaging that works for ecommerce often fails retail requirements. Case pack quantities, GS1-128 labeling, retail-ready packaging, and pallet specifications all need to be addressed. Budget time and money for packaging changes.
5. Not budgeting for the cash flow gap
You’ll spend $3,000–$12,000+ on onboarding costs, produce inventory, and ship the order—all before receiving your first payment 30–90 days after delivery. Many small brands are blindsided by this cash flow gap.
6. Trying to onboard multiple retailers simultaneously
Each retailer has different systems, portals, EDI configurations, and compliance requirements. Onboarding two retailers at once doubles the workload and the opportunities for errors. Get one right first, then expand.
7. Treating onboarding as a one-time event
Retailers update their requirements regularly. Routing guides change, portal features evolve, and compliance standards tighten. Build processes for monitoring and adapting to changes after the initial onboarding is complete.

How Much Does Vendor Onboarding Cost?
New vendors are often surprised by the upfront costs of entering retail. Here’s a realistic breakdown of what to budget for your first retailer:
| Expense | One-Time Cost | Recurring Cost | Notes |
|---|---|---|---|
| GS1 Company Prefix | $250–$2,500 | $50–$500/year | Based on number of products. 10 products = $250 initial, $50/year renewal. |
| EDI Provider Setup | $0–$2,000 | $100–$1,000/month | Web portals are cheapest. Full-service providers charge setup fees. |
| Product Liability Insurance | $500–$2,000 | $500–$3,000/year | Annual premium depends on product type and coverage amounts. |
| Packaging Redesign | $1,000–$5,000 | — | Only if D2C packaging doesn’t meet retail requirements. |
| Barcode Printing Equipment | $300–$1,500 | — | Thermal label printers for GS1-128 labels. Can use a 3PL’s instead. |
| Legal Review | $500–$2,000 | — | Attorney review of vendor agreement. Optional but recommended. |
Total estimated upfront cost: $3,000–$12,000+ depending on your product category, whether you need packaging redesign, and how many retailers you’re onboarding simultaneously. These costs are in addition to the inventory you’ll need to produce for your first order, which retailers typically don’t pay for until 30–90 days after delivery.
Frequently Asked Questions
Onboard to Any Retailer in Weeks, Not Months
Brands and 3PLs use RetailerHub to instantly answer any retailer compliance question, generate warehouse-ready SOPs, and get alerted when requirements change. Built by a former ShipBob Lead WMS Engineer with 10+ years in fulfillment.
Related Guides
Retail Guide
How to Get Your Product into Retail Stores
The complete journey from D2C to retail shelves.
Supply Chain
Advance Shipment Notification (ASN) Guide
Everything vendors need to know about EDI 856.
Supply Chain
What is EDI?
A retail vendor’s guide to electronic data interchange.
Supply Chain
GS1-128 Shipping Labels
How to create compliant SSCC shipping labels.
Supply Chain
Retail Chargebacks
Common chargeback types and how to prevent them.
Supply Chain
Vendor Scorecard Guide
How retailers measure vendor performance.
Streamline retail compliance with our AI-powered system.
- Quick Links
- Home
- Pricing
- Who We Are
- Contact Us
- adrian@retailerhub.ai
Copyright © 2026 RetailerHub. All Rights Reserved.